
Mary Berry Cheese Scones Recipe
Mary Berry Cheese Scones Recipe is one I keep coming back to when I want something warm, simple, and full of flavor. I made these on a quiet afternoon, and the smell of melted cheese filled my kitchen in the best way.
These classic British cheese scones are soft inside, lightly crisp on top, and packed with sharp Cheddar taste.
They come from the long tradition of British baking, and they stay popular because they are quick, easy, and always satisfying. I like how basic ingredients turn into something so good.
You don’t need fancy tools or skills. Just flour, butter, cheese, and a little care.
If you enjoy savory bakes or want a quick treat for tea time, this is a great place to start. Give it a try, you might end up making them every week like I do.

Why You’ll Love These Mary Berry Cheese Scones
I’ve baked a lot of scones over the years, but this one stands out for simple reasons. It works every time, and the taste feels just right.
First, the texture. These scones come out light and soft inside, not heavy or dry. That’s something I really care about when baking.
Then comes the flavor. The mature Cheddar gives a rich, slightly sharp taste that melts into every bite. It’s not bland at all.
Here’s what makes these scones so good:
- They’re quick to make. From start to finish, you’re looking at around 25 minutes. That includes prep and baking time. No chilling. No resting. No waiting around.
- The cheese flavour is proper strong. Mary Berry uses mature Cheddar, and you can really taste it. These aren’t bland scones with a hint of cheese hiding somewhere in the background. They’re bold and savoury.
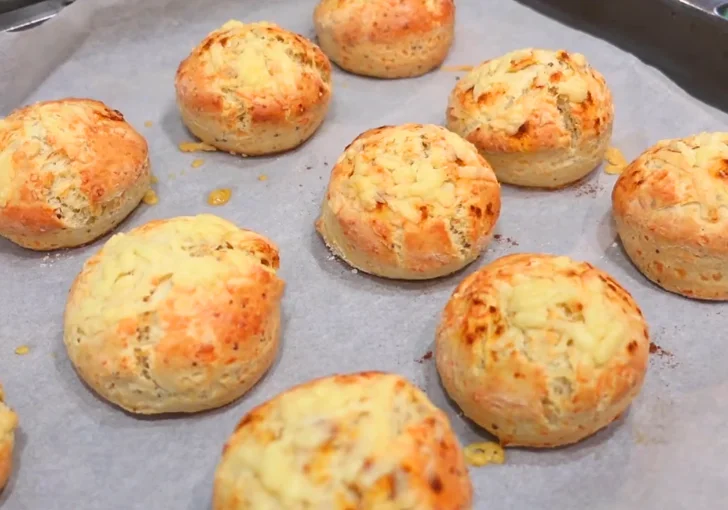
- The texture is unreal. Light on the inside, slightly crisp on the outside. When you break one open, you can see how well they’ve risen. That contrast between the soft crumb and the golden crust is what makes them so satisfying.
- Perfect for beginners. If you’ve never baked before, this is a brilliant place to start. There’s no tricky technique involved. You just rub butter into flour, stir in cheese, add milk, and bake.
- They use basic ingredients. No cream, no eggs, no specialist cheese. Just simple stuff you likely already have at home. That’s Mary Berry’s whole philosophy. Good food doesn’t need to be complicated.
Mary Berry Cheese Scones Perfect For
A lazy weekend brunch — Bake a batch on a Saturday morning. Slice them open, add a bit of butter, and enjoy with a cup of tea. Simple as that.
Lunchboxes — They hold up well and taste great at room temperature. Pop one into your lunchbox with some salad or soup on the side.
Afternoon tea spread — Cheese scones sit right alongside sweet scones on any afternoon tea table. They add a nice savoury balance.
Quick snack after school — Kids love these. They’re filling, tasty, and way better than grabbing a packet of crisps.
Meal prep for the week — Make a big batch on Sunday. Store them properly and you’ve got snacks sorted for the next few days.
Last-minute guests — Someone pops round unexpectedly? These take less than half an hour. You’ll look like a star without breaking a sweat.
Mary Berry Cheese Scones Ingredients
225g self-raising flour – I usually grab a bag like McDougalls or Tesco own brand; it already has raising agents mixed in, so it saves time and helps the scones come out light and soft without needing extra steps.
1 tsp baking powder – I add a little extra lift using something like Dr. Oetker baking powder; it helps the scones rise better and keeps them from feeling too heavy, especially if the flour has been sitting in the cupboard for a while.
½ tsp mustard powder – I use Colman’s mustard powder for that gentle warmth; it doesn’t make the scones taste like mustard, just gives a deeper flavor that works really well with the cheese.
½ tsp salt – Just regular table salt works fine here; I add it to bring out all the flavors, especially the cheese, and it keeps the scones from tasting flat or dull.
50g cold butter – I go for unsalted butter, usually something like Anchor; keeping it cold is important because it helps create that soft, crumbly texture once baked.
100g mature Cheddar cheese – I like using a strong Cheddar like Cathedral City; it melts nicely and gives that rich, sharp taste that makes these scones really stand out.
120–150ml milk – I use whole milk most of the time; it brings the dough together and keeps it soft, adding just enough moisture without making it too wet.
Extra milk – I brush a little on top before baking; it helps the scones turn golden and gives them a nice finish straight out of the oven.
Ingredients Substitutions & Variations
- Use plain flour + extra baking powder if no self-raising flour
- Swap Cheddar with Red Leicester or a mix of cheeses
- Add a pinch of black pepper for a little kick
- Mix in chopped chives for fresh flavor
- Use plant-based butter and milk for a dairy-free version
- Try wholemeal flour for a slightly nutty taste
How To Make Mary Berry Cheese Scones
Step 1: Prepare the Oven and Tray
Set your oven to 220°C (200°C fan) / 425°F / Gas Mark 7. Line a baking tray with parchment paper. This stops the scones from sticking and makes cleanup much easier. Let the oven heat up fully before you put anything in.
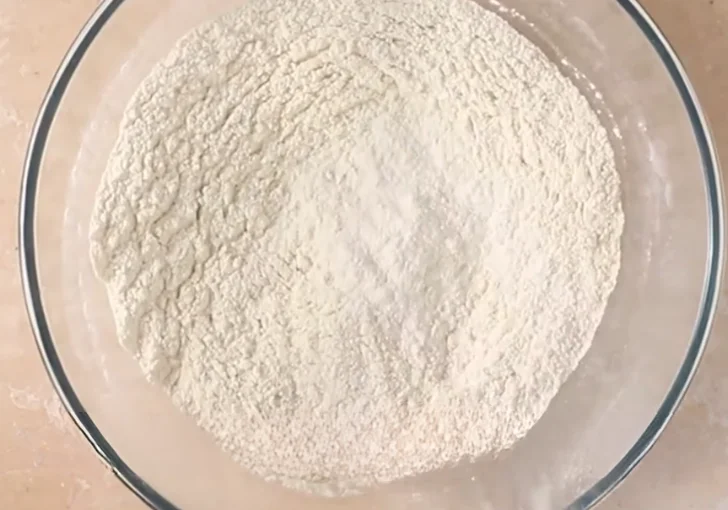
Step 2: Combine the Dry Ingredients
Grab a large mixing bowl. Add the self-raising flour, baking powder, mustard powder, and salt. Give it all a good stir with a spoon or whisk. You want the raising agents and seasoning spread evenly through the flour so every scone bakes the same.
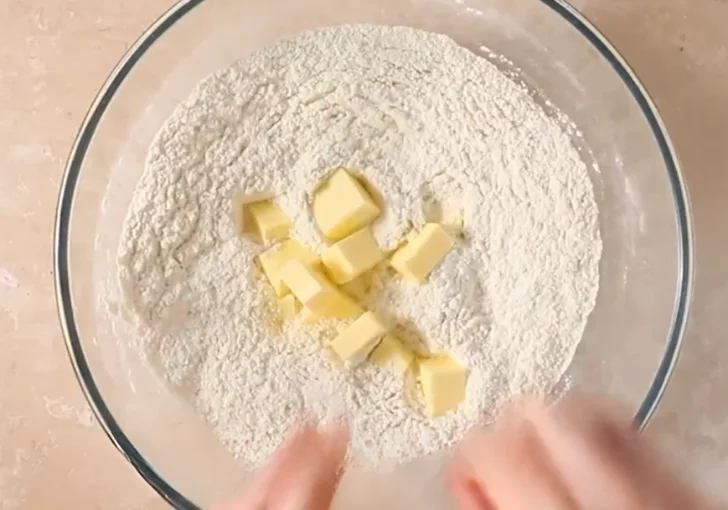
Step 3: Rub in the Butter
Drop the cold, cubed butter into the bowl. Now use your fingertips to rub the butter into the flour. Keep going until the mixture looks like fine breadcrumbs. Work quickly here. You don’t want the butter to warm up too much from the heat of your hands. Keeping it cold is what gives the scones that light, tender crumb.
Step 4: Add the Cheese
Tip in the grated Cheddar cheese. Stir it through the breadcrumb mixture so it’s well spread out. Every scone should have plenty of cheese running through it. No one wants a cheese scone with no cheese in the middle.

Step 5: Form the Dough
Pour in the milk a little at a time. Use a knife or spatula to stir gently. You’re looking for a soft dough that just comes together. Don’t tip all the milk in at once — you might not need the full amount. And whatever you do, don’t overwork it. Too much mixing makes tough scones. Stop as soon as the dough holds together.
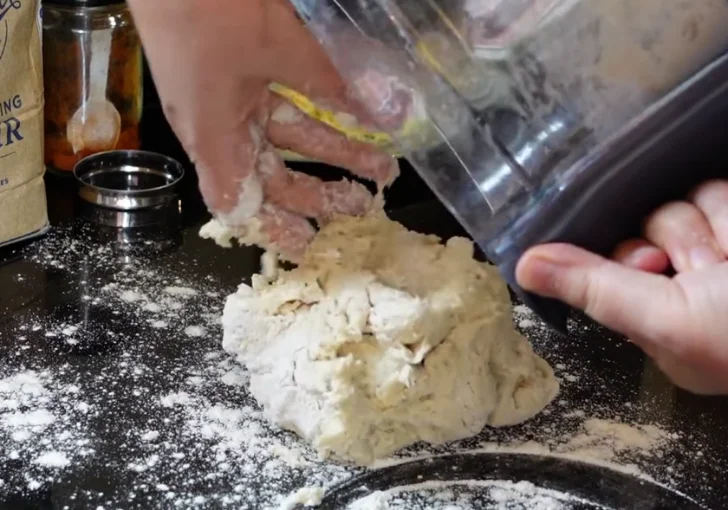
Step 6: Shape the Dough
Lightly flour your work surface. Turn the dough out and roll it gently to about 2cm thick. Don’t press down too hard. Handle it like it’s delicate, because it is. A light touch here means lighter scones later.
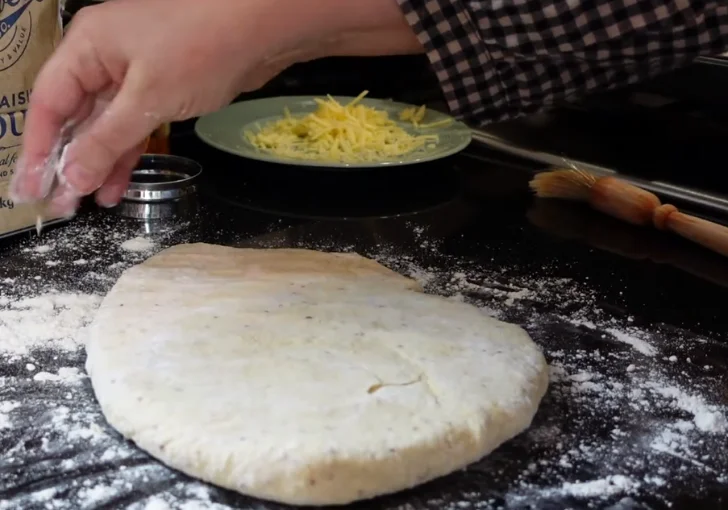
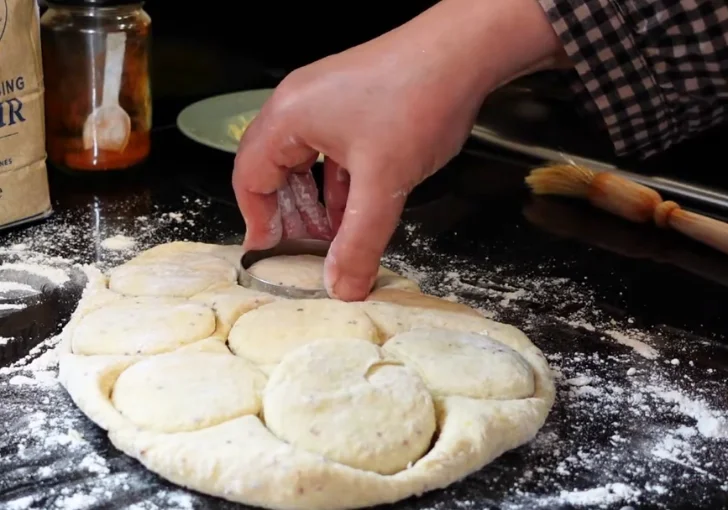
Step 7: Cut the Scones
Use a round cutter to stamp out your scones. Press straight down firmly and lift straight back up. Don’t twist the cutter — twisting seals the edges and stops the scones from rising properly. Gather up any leftover bits of dough, press them together gently, roll again, and cut more. You should get around 8 to 10 scones depending on the size of your cutter.
Step 8: Prepare for Baking
Place each scone onto your lined tray. Leave a little gap between them so they have room to spread and rise. Brush the tops with a splash of milk. This gives them that gorgeous golden colour on top once they come out of the oven.
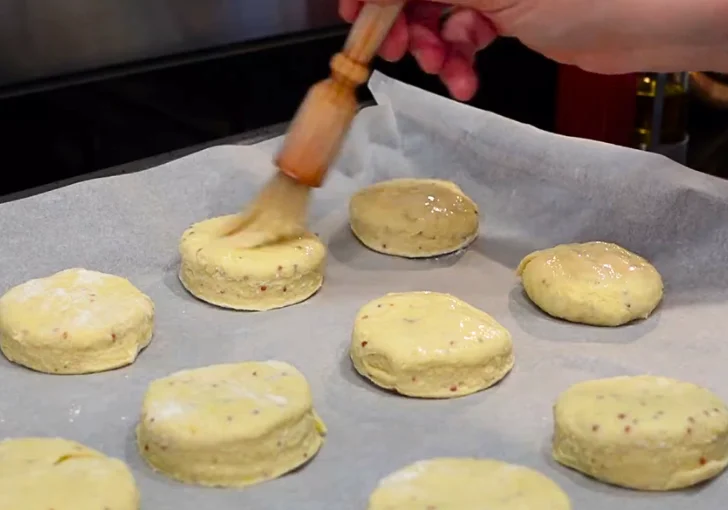
Step 9: Bake
Slide the tray into the preheated oven. Bake for 12 to 15 minutes. You’ll know they’re done when they’ve risen well and turned a nice golden brown on top. Don’t open the oven door during the first 10 minutes. Let them do their thing.
Step 10: Serve
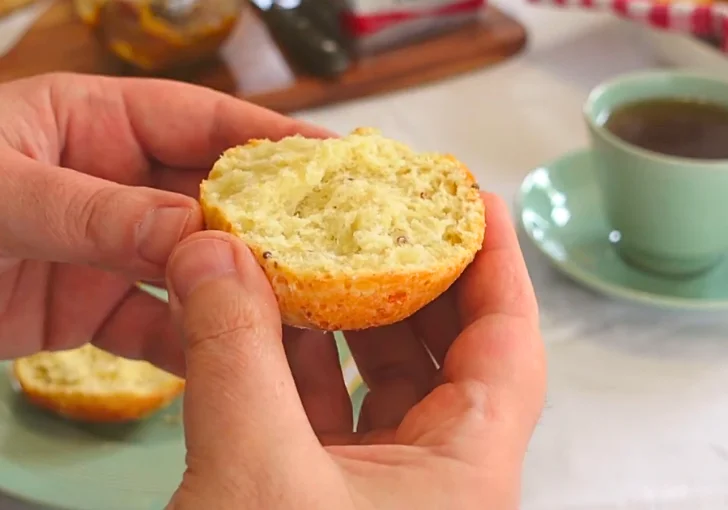
Take them out and let them cool on the tray for a couple of minutes. Then move them to a wire rack. They’re best eaten warm, when the cheese is still a bit melty and the inside is soft and fluffy. Honestly, the smell alone is enough to get everyone into the kitchen.
Recipe Tips for Fluffy Mary Berry Cheese Scones
Keep everything cold. Cold butter and cold milk give better rise. If your kitchen is warm, pop the cubed butter back in the fridge for a few minutes before you start.
Don’t skip the mustard powder. It might seem odd, but it really lifts the cheese flavour. You won’t taste mustard in the finished scone, just richer cheese.
Use a sharp cutter. A blunt cutter presses the edges down and stops the scones from rising evenly. If you don’t have one, use an upturned glass with a thin rim.
Grate the cheese finely. Coarsely grated cheese can leave big pockets in the scone. Fine grating means the cheese melts more evenly and gives a smoother texture.
Don’t re-roll the dough too many times. The more you handle it, the tougher it gets. Two re-rolls at most.
Place scones close but not touching. When scones are near each other on the tray, they help each other rise upward instead of spreading outward. About 1cm apart is ideal.
Bake on a high shelf. The top of the oven is usually the hottest. Putting the tray higher helps the scones rise faster and get that golden crust.
What to Serve with Mary Berry Cheese Scones
Butter and Chutney – You can keep it simple with a warm scone, a bit of butter, and a spoon of chutney. The mix of creamy and slightly sweet taste works really well and makes each bite feel more full and balanced.
Tomato Soup – A bowl of warm tomato soup pairs nicely with these scones. The soft texture of the scone and the smooth soup together make a cozy and easy meal, especially when you want something light but filling.
Sliced Ham – Add a slice of ham on the side or inside the scone. It gives a salty bite that matches the cheese, making it feel more like a quick lunch than just a snack.
Fresh Green Salad – You can serve these with a simple green salad. The fresh crunch helps balance the rich cheese flavor and keeps the meal from feeling too heavy.
Tea or Coffee – A hot cup of tea or coffee goes perfectly with these scones. It keeps things easy and makes the whole plate feel complete without needing much else.

Gifting Ideas
- Wrap a batch in a clean tea towel and tie it with string or ribbon. Simple, rustic, and thoughtful. Great for dropping off at a neighbour’s door.
- Pack them in a small basket with a pot of chutney and a block of cheese. It’s like a little afternoon tea hamper.
- Give them as a “bake kit.” Measure out the dry ingredients into a jar, write the recipe on a tag, and attach it. The person just needs to add butter and milk. Fun and personal.
- Bring to a bake sale. Cheese scones sell fast. People love savoury options alongside all the cakes and brownies.
- Include in a care package. If someone’s feeling under the weather or just had a baby, a box of homemade cheese scones shows you care without saying too much.
- Hostess gift. Heading to someone’s house for lunch or dinner? Show up with a batch of warm cheese scones instead of flowers. Guaranteed smile.
How To Store Leftover
At Room Temperature
Place the cooled scones in an airtight container or wrap them tightly in cling film. They’ll stay good for up to 2 days. Keep them out of direct sunlight and away from heat.
In the Fridge
If your kitchen runs warm, store them in the fridge. They’ll last about 3 to 4 days this way. Just make sure they’re sealed well so they don’t dry out or pick up other smells from the fridge.
Freezing
Cheese scones freeze really well. Let them cool completely, then wrap each one individually in cling film or put them in a freezer bag. They’ll keep for up to 3 months. When you want one, take it out and let it thaw at room temperature. Then pop it in the oven at 180°C for about 5 minutes to warm through. Tastes almost as good as fresh.
Reheating
Never microwave cheese scones if you can avoid it. It makes them rubbery. Instead, reheat in the oven or toaster oven for a few minutes. You want them warmed through with a slightly crisp outside. That’s the sweet spot.
Mary Berry Cheese Scones FAQs
1. Can I make Mary Berry cheese scones without a cutter?
Yes, absolutely. If you don’t have a round cutter, use the rim of a glass or a small cup. You can also shape them by hand into rough rounds. They won’t look as uniform, but they’ll taste exactly the same. Some people actually prefer the rustic look of hand-shaped scones.
2. Why did my cheese scones not rise properly?
A few things can cause flat scones. The most common reason is overmixing the dough. When you work it too much, the gluten tightens up and the scones become dense. Another reason could be twisting the cutter, which seals the edges. Also check your baking powder isn’t past its use-by date.
3. Can I use pre-grated cheese from a bag?
You can, but freshly grated cheese works better. Pre-grated cheese often has a coating to stop it clumping, and that coating can affect how it melts and blends into the dough. If you’ve got a block of Cheddar, grate it yourself for the best result.
4. Do I need to use mustard powder?
You don’t have to, but I’d recommend it. Mustard powder doesn’t make the scones taste of mustard. It just brings out the cheesy flavour and adds a subtle depth. If you really don’t want to use it, just leave it out and add a tiny bit more salt instead.
5. Can I add herbs to this recipe?
For sure. Chopped chives, fresh thyme, or dried rosemary all work nicely with cheese scones. Add them in when you mix in the cheese. Start with a tablespoon and adjust to your taste. It’s a great way to change things up without messing with the base recipe.
6. How thick should I roll the dough?
Aim for about 2cm. If you roll it too thin, the scones won’t have enough height to rise properly. Too thick and they might not cook all the way through in the middle. Two centimetres gives a good balance between a tall rise and even baking.
7. Can I make the dough ahead of time?
You can prepare the dough, cut the scones, and keep them on the tray in the fridge for a couple of hours before baking. Cover with cling film so they don’t dry out. Don’t leave them overnight though, as the baking powder starts working once it touches liquid. Bake them the same day for the best rise.
8. Why do my scones taste dry?
Dry scones usually mean too much flour or not enough milk. When you measure flour, spoon it into the measuring cup and level it off. Don’t pack it in. Also, be generous with the milk. The dough should feel slightly sticky, not dry or crumbly. That moisture is what creates a tender scone.
9. Can I use a food processor to make the dough?
Yes, you can pulse the butter and flour together in a food processor instead of rubbing by hand. Just be careful not to over-process. A few short pulses until it looks like breadcrumbs is all you need. Then tip it into a bowl, add cheese and milk, and bring it together by hand.
10. Are Mary Berry cheese scones suitable for vegetarians?
They are, as long as you use a vegetarian-friendly cheese. Some mature Cheddars contain animal rennet, so check the label. Many supermarkets now stock vegetarian Cheddar that tastes just as good. Everything else in the recipe is already vegetarian-friendly.

Mary Berry Cheese Scones Recipe
Mary Berry Cheese Scones Recipe is one I keep baking when I want something quick, warm, and full of cheesy flavor. This classic bake from Mary Berry comes together fast with simple ingredients and gives soft, golden scones every time. I’ve made this Mary Berry cheese scones recipe on busy mornings and it never fails. It’s easy, beginner-friendly, and ready in under 30 minutes. If you enjoy savory bakes, this is a great choice. Serve them warm with butter, or you can add soup, salad, or even sliced ham on the side.
Ingredients
- 225g self-raising flour
- 1 tsp baking powder
- ½ tsp mustard powder
- ½ tsp salt
- 50g cold butter, cubed
- 100g mature Cheddar cheese, grated
- 120–150ml milk (plus extra for brushing)
Instructions
- Prepare the Oven and Tray: Preheat the oven to 220°C (200°C fan) / 425°F / Gas Mark 7 and line a baking tray with parchment paper so the scones do not stick and can bake evenly.
- Combine the Dry Ingredients: Place the flour, baking powder, mustard powder, and salt into a large mixing bowl and stir everything together thoroughly so the raising agents and seasoning are evenly distributed throughout the flour.
- Rub in the Butter: Add the cold, cubed butter into the bowl and using fingertips rub the butter into the flour mixture until it resembles fine breadcrumbs, working lightly and quickly to keep the mixture airy which helps produce a light texture in the finished scones.
- Add the Cheese: Stir the grated Cheddar cheese into the breadcrumb mixture and mix well so the cheese is evenly spread throughout, ensuring every scone has a consistent flavour.
- Form the Dough: Gradually pour in the milk, stirring gently with a knife or spatula until a soft dough forms, adding just enough milk to bring the mixture together and avoiding overmixing as this can make the scones dense rather than light.
- Shape the Dough: Turn the dough out onto a lightly floured surface and gently roll it out to a thickness of about 2 cm, handling the dough lightly to keep it soft and well-risen during baking.
- Cut the Scones: Using a round cutter press straight down into the dough to cut out scone shapes, avoiding twisting the cutter as this can prevent the scones from rising evenly, then gather any leftover dough, reshape gently, and cut again.
- Prepare for Baking: Place the scones onto the lined baking tray leaving space between each one to allow for rising and brush the tops lightly with milk to give a golden finish when baked.
- Bake: Bake in the preheated oven for 12–15 minutes until the scones are well risen and golden brown on top.
- Serve: Remove from the oven and allow to cool slightly before serving, best enjoyed warm when the texture is light and the cheese flavour is at its richest.
Nutrition Information:
Serving Size:
1 sconeAmount Per Serving: Calories: 180
Mary Berry Cheese Scones Recipe is one of those simple bakes that always feels worth it. I’ve made it many times, and it never disappoints. The texture, the cheesy flavor, and the ease of making it all come together so nicely.
If you enjoy easy baking with big flavor, this is something you should try soon. Once you make them, you might keep coming back to this recipe just like I do.
Give it a go in your kitchen and see how it turns out. I’d love to hear your experience, so feel free to share.