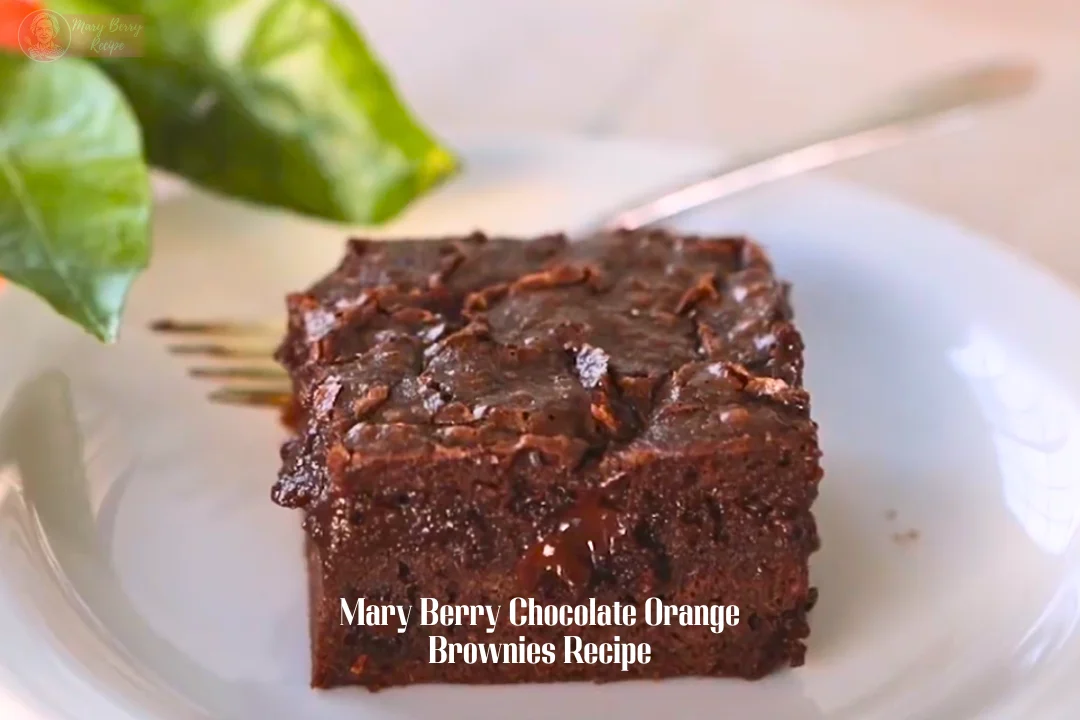
Mary Berry Chocolate Orange Brownies Recipe
Mary Berry Chocolate Orange Brownies Recipe is one of my go-to bakes when I want something rich but still fresh in taste. These brownies are soft, fudgy, and packed with deep chocolate flavor, with a light hint of orange that makes each bite feel a bit special.
What you get here is a simple homemade brownie that feels bakery-style without extra work. The mix of melted chocolate, butter, and fresh orange zest gives a smooth texture and a bright flavor.
I first tried this after reading a recipe inspired by Mary Berry cookbooks, and it quickly became a favorite in my kitchen.
I like this chocolate orange brownie recipe because it’s easy to follow and always turns out good. You don’t need fancy tools or hard steps. Just basic ingredients and a fresh orange.
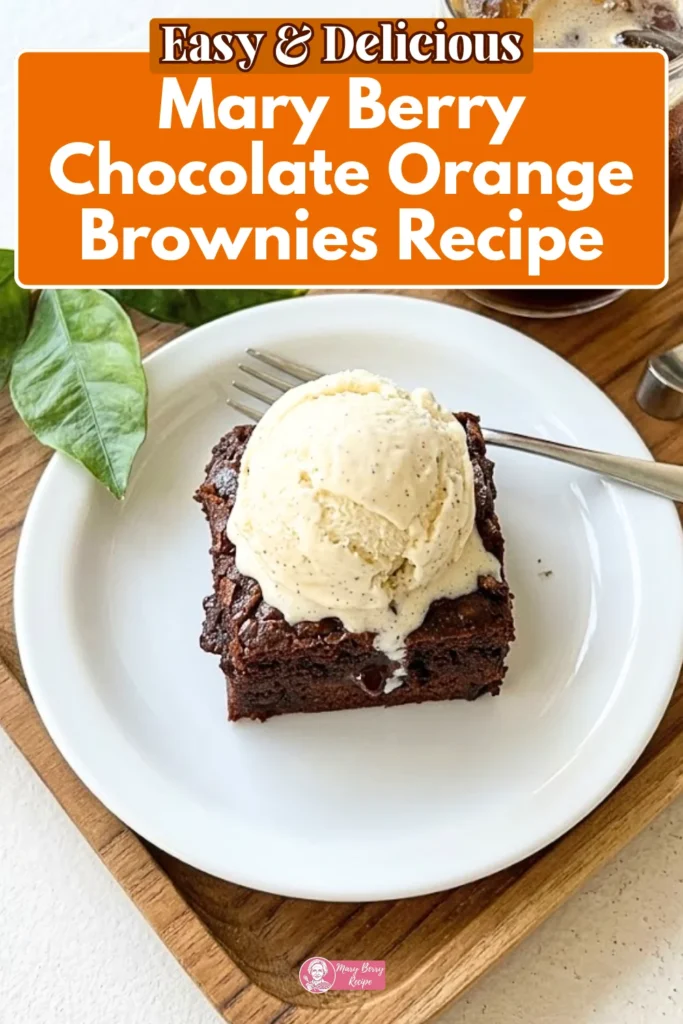
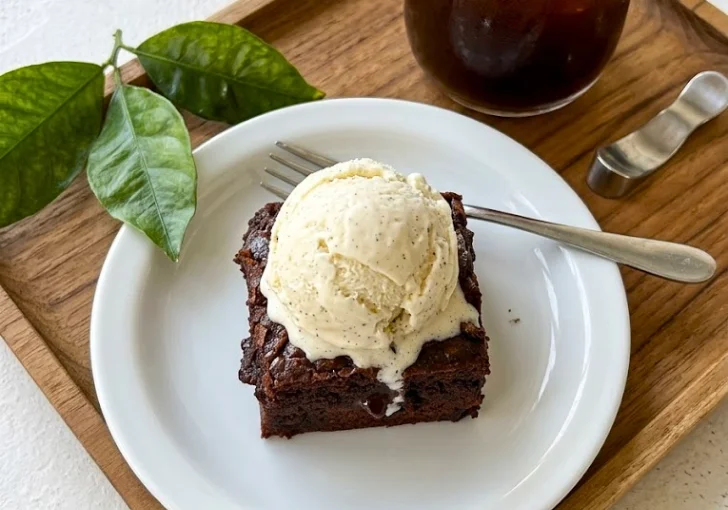
You can serve these brownies warm with vanilla ice cream, fresh berries, or even a cup of coffee. It fits both a quick treat or a nice dessert at home.
Why You’ll Love Mary Berry Chocolate Orange Brownies
There’s something about this chocolate orange brownies recipe that just works without stress. I’ve made it a few times now, and each time it turns out soft in the middle with that thin crackly top. You don’t need special skills either.
Here’s what makes it stand out:
- The texture hits right
Soft center, slightly crisp edges. Not dry, never cakey. - Chocolate and orange feel balanced
The orange doesn’t take over. It just adds a fresh note. - Simple steps
No tricky methods. You mix, fold, bake. That’s it. - Uses easy ingredients
Most items are already in your kitchen. - Great for any time
Works as a dessert or just a quick sweet bite. - Smells amazing while baking
That chocolate and orange combo fills the whole kitchen.
I like recipes that don’t make me think too much. This one is just mix and trust the oven.
Mary Berry Chocolate Orange Brownies Ingredients
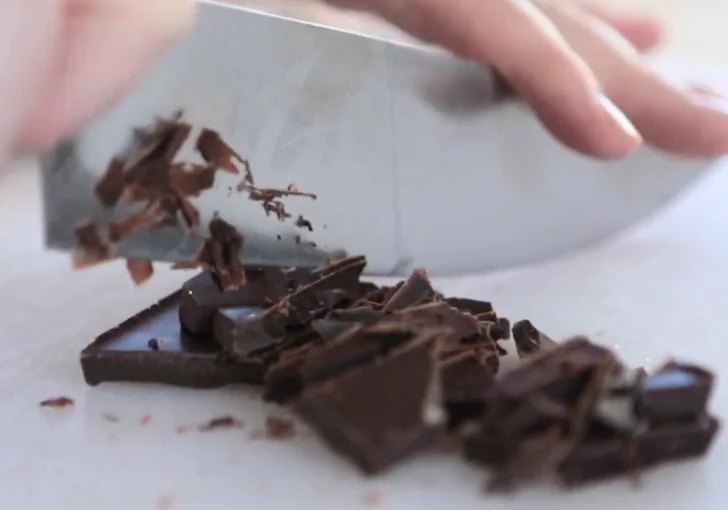
200 g dark chocolate – I like using Lindt or Ghirardelli here because it melts smooth and tastes rich. This is the base of the brownies, so good quality chocolate really makes a big difference in flavor and texture.
½ cup unsalted butter (melted) – I always use unsalted butter so I can control the salt level. It adds moisture and helps create that soft, fudgy center with slightly crisp edges after baking.
1½ cups granulated sugar – Regular white sugar works best for me. It sweetens the brownies and also helps form that thin, shiny, crackly top layer that I really enjoy in every bite.
4 large eggs – Eggs hold everything together and give structure. I use large eggs at room temperature so they mix better and help create a smooth, slightly thick batter.
¾ cup all-purpose flour – Just standard flour here. I don’t add too much because I want the brownies soft and fudgy, not cakey. A little less flour keeps the texture just right.
½ teaspoon salt – A small amount, but it matters. It balances the sweetness and brings out the chocolate flavor more. I usually use fine sea salt for better mixing.
100 g dark chocolate chunks – I chop a chocolate bar into chunks instead of chips. It melts into little pockets inside the brownies, which makes each bite extra rich and gooey.
Zest of 1 large orange – I use a fresh navel orange. The zest adds a light citrus smell and taste without making the batter watery. Just be careful not to include the bitter white part.
1–2 teaspoons fresh orange juice – Fresh juice works best. It gives a soft, natural orange flavor that pairs really well with chocolate. I don’t add too much so it doesn’t thin the batter.
¼ cup heavy cream – I use heavy cream to melt the chocolate smoothly. It adds richness and helps create that glossy, silky chocolate mixture that blends perfectly into the batter.
Ingredients Substitutions & Variations
- Milk chocolate instead of dark chocolate – I use this when I want a sweeter, lighter taste; it makes the brownies less rich and more kid-friendly
- Orange extract instead of fresh juice – A few drops work fine if I don’t have fresh oranges; it still gives that citrus touch without extra liquid
- Brown sugar instead of white sugar – I swap this sometimes for a deeper, slightly caramel-like flavor and a bit more moisture in the brownies
- Gluten-free flour blend instead of all-purpose flour – I use a 1:1 gluten-free mix when needed, and it still gives a soft, fudgy texture
- Chopped walnuts or pecans added in – I like adding a small handful for crunch; it gives a nice contrast to the soft brownie base
- Coconut cream instead of heavy cream – I use this as a dairy-free option; it still melts the chocolate well and adds a mild coconut hint
- Extra orange zest for stronger flavor – I add a bit more zest when I want the orange to stand out more in each bite
- White chocolate chunks mixed in – I sometimes mix these with dark chocolate for a sweeter, creamy contrast inside the brownies
How To Make Mary Berry Chocolate Orange Brownies
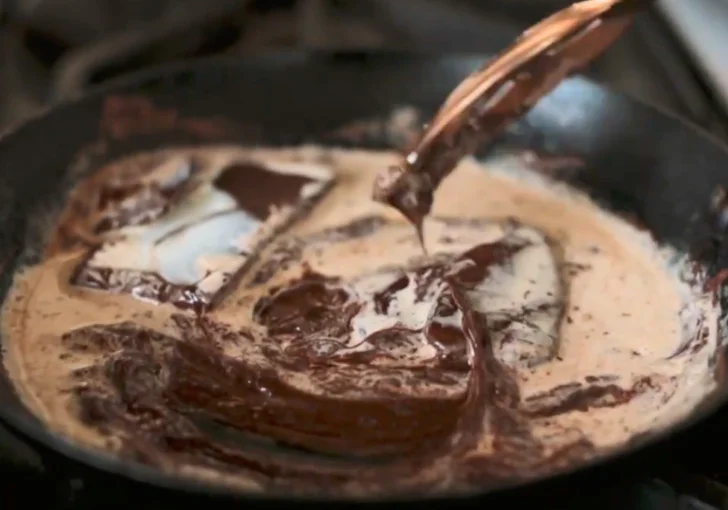
Step 1: Melt Chocolate with Cream
Place the dark chocolate and heavy cream into a skillet over medium-high heat. Allow the cream to heat until hot, then turn off the heat and let the mixture sit undisturbed. Stir gently until the chocolate fully melts into a smooth, glossy mixture.
Step 2: Combine Eggs and Sugar
In a large mixing bowl, crack in the eggs and add the granulated sugar. Mix until well combined. The mixture should look slightly thick and glossy.
Step 3: Add Melted Butter
Pour in the melted butter and mix thoroughly. This helps create the signature crispy edges once baked.
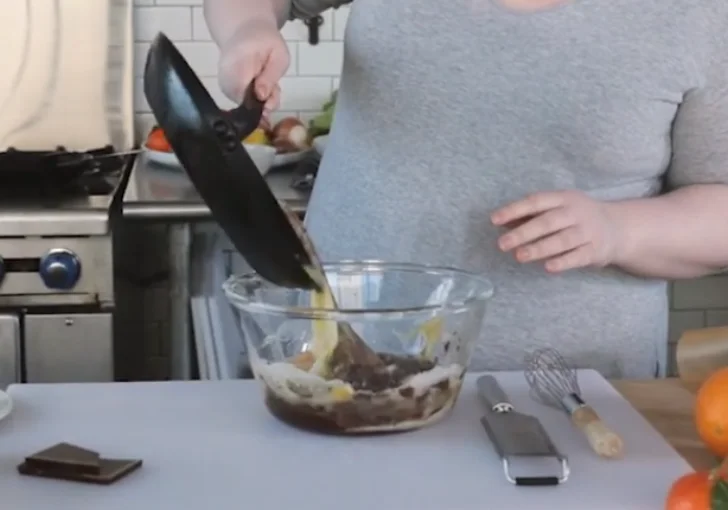
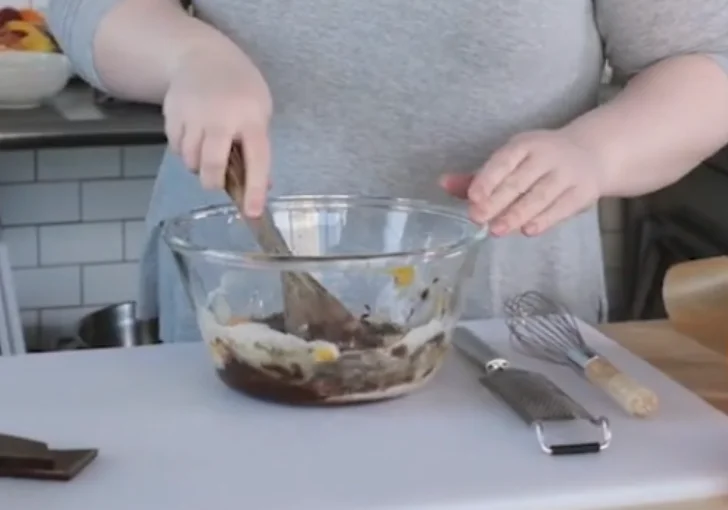
Step 4: Incorporate Melted Chocolate
Add the melted chocolate mixture into the bowl. Stir until fully combined and smooth.
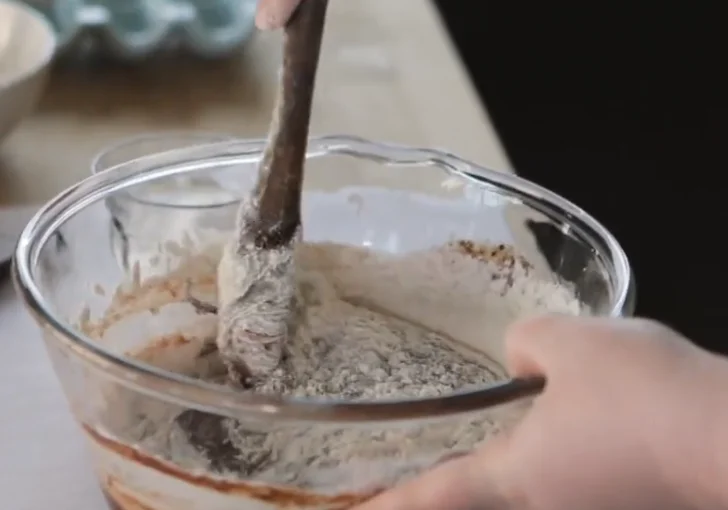
Step 5: Add Dry Ingredients
Sprinkle in the salt and flour. Gently fold the mixture together until just combined. Avoid overmixing; a few small streaks of flour can remain at this stage.
Step 6: Fold in Chocolate Chunks
Add the chopped chocolate chunks and fold them into the batter. These create pockets of melted chocolate throughout the brownies.
Step 7: Add Orange Flavor
Finely zest the orange, making sure to avoid the white pith, which is bitter. Add the zest to the batter. Squeeze in a small amount of fresh orange juice and gently mix until just incorporated. The batter can remain slightly lumpy.

Step 8: Prepare the Pan
Line a baking pan with parchment paper, pressing it into the corners so it holds its shape. No greasing is required.
Step 9: Fill the Pan
Spoon the brownie batter into the prepared pan and spread it evenly.
Step 10: Bake
Place the pan into a preheated oven at 350°F (175°C). Bake for 15–18 minutes, until the edges are set and the center remains soft and gooey.
Step 11: Cool and Slice
Remove from the oven and allow the brownies to cool slightly. Lift them out using the parchment paper, then cut into squares while still slightly warm for a soft, fudgy texture.
Recipe Tips for Mary Berry Chocolate Orange Brownies
Don’t overmix the batter – I’ve made this mistake before, and it made the brownies dense and a bit tough. Mix just until combined. A few streaks of flour are fine and actually help keep that soft texture.
Use good quality chocolate – I always go for brands like Lindt or Ghirardelli because the flavor really shows here. Since chocolate is the main base, better quality gives a richer, smoother taste in every bite.
Watch the baking time closely – I usually start checking around 15 minutes. The center should still look slightly soft. If you bake too long, you lose that fudgy middle and it turns more cake-like.
Let them cool before slicing – It’s tempting to cut right away, I get it. But I wait at least a bit so they hold shape better. Warm is fine, just not straight out of the oven.
Use fresh orange zest only – I always zest a fresh orange because it gives a clean, bright flavor. Bottled or dried options just don’t taste the same and can feel a bit dull.
Go light on the orange juice – I only add a small amount because too much liquid can mess with the texture. The zest already brings strong flavor, so don’t overdo the juice part.
Line your pan properly – I press the parchment paper into the corners so it stays in place. This makes it super easy to lift the brownies out later without breaking them apart.
Use a sharp knife for slicing – I wipe the knife between cuts to keep edges clean. It takes a bit more time, but the brownies look much nicer when serving or packing.
What to Serve with Mary Berry Chocolate Orange Brownies
Vanilla Ice Cream – You can serve these brownies warm with a scoop of vanilla ice cream. The cold and creamy texture melts slightly over the brownie, making each bite smooth, rich, and really satisfying without needing anything extra.
Fresh Berries – Add strawberries or raspberries on the side for a fresh touch. The slight tartness from the berries cuts through the sweetness and gives a more balanced bite, which I’ve found works really well.
Whipped Cream – A spoon of lightly whipped cream on top keeps things simple but adds a soft and airy feel. It doesn’t overpower the brownie, just makes it feel a bit more complete.
Hot Coffee – You can pair these brownies with a cup of hot coffee. The slight bitterness of coffee balances the sweet chocolate and orange flavor, making it a nice option for a calm evening treat.
Cold Milk – A glass of cold milk always works. It softens the rich chocolate taste and makes each bite feel lighter, especially if you’re having a bigger piece or sharing with others.
Gifting Ideas
If you plan to share these brownies, here are some easy ideas:
- Wrap in parchment and tie with string
- Place in a small gift box with a handwritten note
- Add orange slices or zest for decoration
- Pack in clear bags for a simple look
- Include a printed recipe card
- Pair with a small jar of hot chocolate mix
- Use festive boxes for holidays
- Stack neatly for a clean presentation
Store Leftover
Leftovers are easy to manage if you store them right.
Keep brownies in an airtight container at room temperature for up to 3 days. They stay soft and fudgy this way. If your kitchen is warm, you can refrigerate them, but let them come back to room temp before eating.
For longer storage, freeze them. Wrap each piece in plastic wrap, then place in a container. They last up to 2 months. Thaw at room temperature when ready to eat.
Avoid leaving them uncovered, they dry out fast.
FAQs
Can I make these brownies ahead of time?
I usually bake them a day before serving. Keep them in a sealed container on the counter. The flavor settles nicely overnight, and the texture stays soft without drying out.
Why did my brownies turn out dry?
Most of the time, it’s from baking too long or adding extra flour. I pull them out when the center still looks a bit soft. They firm up as they cool.
Can I leave out the orange part?
You can skip it, but the taste will feel more basic. The orange lifts the chocolate and adds a fresh note. Even a little zest makes a difference in the final bite.
What chocolate should I use for best results?
I stick with dark chocolate bars, not chips. Bars melt smoother and taste better. Brands like Lindt or Ghirardelli give a richer flavor that really shows in these brownies.
Is fresh orange juice really needed?
Fresh juice works better because it tastes brighter. Bottled juice can feel dull and slightly bitter. I only add a small amount anyway, so one orange is enough.
How can I tell when brownies are ready?
I look at the edges first, they should look set. The middle should still be soft. If a toothpick comes out with a few sticky crumbs, that’s the spot I aim for.
Can I bake this in a different pan size?
Yes, just adjust the time a bit. A thinner layer bakes faster, while a thicker one needs more time. I keep checking early to avoid overbaking.
Why does my batter feel too thick?
It can happen if flour is packed too tightly or not mixed evenly. I lightly scoop flour and fold gently. The batter should feel thick but still easy to spread.
Can I freeze these brownies?
I do freeze them sometimes. Wrap each piece well, then store in a container. When ready, let them sit at room temp until soft again. The texture stays pretty close to fresh.
What’s the best way to cut neat brownie squares?
I let them cool a bit, then use a sharp knife. I wipe the blade after each cut. It takes a little effort, but the slices come out much cleaner that way.

Mary Berry Chocolate Orange Brownies Recipe
Mary Berry Chocolate Orange Brownies Recipe is my go-to when I want a rich, fudgy treat with a fresh citrus twist. Inspired by Mary Berry’s classic UK cookbook style, this recipe uses simple steps and pantry basics to create soft brownies with deep chocolate flavor and a light orange touch. It takes about 30 minutes from start to finish and feels easy even on a busy day. I’ve made this many times, and it never fails. You can serve these warm with ice cream, berries, or a cup of coffee for a simple dessert.
Ingredients
- 200 g (7 oz) dark chocolate (for melting)
- ½ cup (115 g) unsalted butter, melted
- 1½ cups (300 g) granulated sugar
- 4 large eggs
- ¾ cup (95 g) all-purpose flour (slightly less than a full cup)
- ½ teaspoon salt
- 100 g (3.5 oz) dark chocolate, roughly chopped into chunks
- Zest of 1 large orange (preferably navel or Cara Cara)
- 1–2 teaspoons fresh orange juice
- ¼ cup (60 ml) heavy cream
Instructions
- Melt Chocolate with Cream: Heat dark chocolate and heavy cream in a skillet over medium-high heat, then turn off the heat and let it sit before stirring into a smooth, glossy mixture.
- Mix Eggs and Sugar: Combine eggs and granulated sugar in a large bowl and mix until thick and slightly glossy.
- Add Melted Butter: Pour in melted butter and mix well to help create crispy edges in the brownies.
- Incorporate Melted Chocolate: Add the melted chocolate mixture and stir until fully combined and smooth.
- Add Dry Ingredients: Sprinkle in salt and flour, then gently fold until just combined without overmixing.
- Fold in Chocolate Chunks: Add roughly chopped chocolate pieces and fold them into the batter for pockets of melted chocolate.
- Add Orange Flavor: Stir in finely grated orange zest and a small amount of fresh orange juice, mixing lightly while keeping the batter slightly textured.
- Prepare Baking Pan: Line a baking pan with parchment paper, pressing it into the corners to fit without using grease.
- Fill the Pan: Spoon the batter into the prepared pan and spread it evenly.
- Bake Brownies: Bake in a preheated oven at 350°F (175°C) for 15–18 minutes until edges are set and the center remains soft and gooey.
- Cool and Slice: Let the brownies cool slightly, lift them out using the parchment paper, and cut into squares while still warm.
Nutrition Information:
Serving Size:
1 brownieAmount Per Serving: Calories: 290
This Mary Berry Chocolate Orange Brownies Recipe is one of those simple bakes that feels special every time. The mix of rich chocolate and fresh orange gives it something extra without making it hard to prepare. I’ve made this more than once, and it always turns out good, even on busy days.
If you enjoy soft, fudgy brownies with a little twist, this one is worth trying. Go ahead and make a batch, share it with someone, or keep it all to yourself, no shame there. And when you try it, I’d love to hear how it turned out for you.